.svg)
File:RAAF Hudson.jpg

Size of this preview: 220 × 163 pixels. Other resolutions: 320 × 237 pixels | 500 × 370 pixels | 640 × 473 pixels.
Original file (640 × 473 pixels, file size: 179 KB, MIME type: image/jpeg)
| Description |
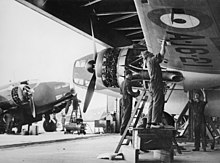
English: Assembly of Lockheed Hudson aircraft at RAAF Station Richmond being undertaken by members of No 2 Aircraft Depot (AD), after being received in component form from America. Hudsons were also assembled at No 1 AD at RAAF Station Laverton in Victoria. The rear fuselage of a Hudson, just visible in the far distance between the two foreground Hudsons, displays A16-1 on its tailplane. Its underside has been painted in Night Black, one of only 16 Hudsons so painted. A16-1 survived Malayan operations with No. 1 Squadron RAAF and was later operated by 1 Operational Training Unit (OTU). The Hudson in the left foreground also displays this undersurface finish, and could thus be either A16-2, -3 or -30. The Hudson aircraft in the right foreground, A16-21, carries a three digit constructor's number (272) on its nose, rather than the normal four digit version. A16-21 had been delivered on 9 February 1940 and was issued to 1 Squadron. Following the squadron's posting to Kota Bharu in Malaya, it was regularly flown by Flight Lieutenant John AH Lockwood who, late on the afternoon of 7 December 1941, reported sighting a Japanese cruiser and a motor ship 112 miles from Kota Bharu which had fired a broadside at his aircraft. The following morning, just after 2.00 a.m. with a full moon, Lockwood led the first attack on Japanese forces by Allied air forces, scoring direct hits on troop transports in the South China Sea. Later, on 14 February 1942, in the desperate defence of Palembang on Sumatra, Lockwood, leading an attack on the approaching Japanese convoy, was last seen 'losing height with smoke pouring from one engine, and two Zeros following it down in close pursuit', according to the only surviving witness, Flight Officer Peter J Gibbes. |
|||||||||||||||||||||
| Date | ||||||||||||||||||||||
| Source |
|
|||||||||||||||||||||
| Author | Australian War Memorial | |||||||||||||||||||||
| Permission (Reusing this file) |
|
|||||||||||||||||||||

Photo taken in New South Wales, Sydney, Richmond
File history
Click on a date/time to view the file as it appeared at that time.
| Date/Time | Thumbnail | Dimensions | User | Comment | |
|---|---|---|---|---|---|
| current | 15:52, 18 June 2019 | | 640 × 473 (179 KB) | wikimediacommons>Kesäperuna | Cropped 3 % vertically using CropTool with lossless mode. |
File usage
The following page uses this file: